
The fastest way to go from picking up a guitar for the first time to actually playing music you recognize is through tablature commonly called TAB. Unlike standard sheet music notation, which requires weeks of theory study before you can decode a single melody, guitar TAB is a visual, intuitive system that most beginners can read within minutes of learning how it works.
This guide gives you everything you need: a clear explanation of how TAB works, what the symbols mean, how to approach practicing tabs correctly, and a curated list of 20 easy guitar tabs organized by style and difficulty covering acoustic, electric, and bass guitar. Each tab is described in general terms so you understand what you are playing, why it works for beginners, and what specific technique it helps you develop.
Before anything else, tune your guitar. No tab sounds right on an out-of-tune instrument, regardless of how well you play it. BMusician’s free Guitar Tuner tool gets you perfectly in tune in seconds make it your first step every single time you practice.
How to Read Guitar TAB
Guitar tablature uses six horizontal lines, each representing one string of the guitar. The bottom line is the lowest-pitched string (the thick low E string), and the top line is the highest-pitched string (the thin high e string).
Numbers written on these lines indicate which fret to press on that string. The number 0 means play the string open with no fret pressed. The number 3 means press the third fret. The number 7 means press the seventh fret.
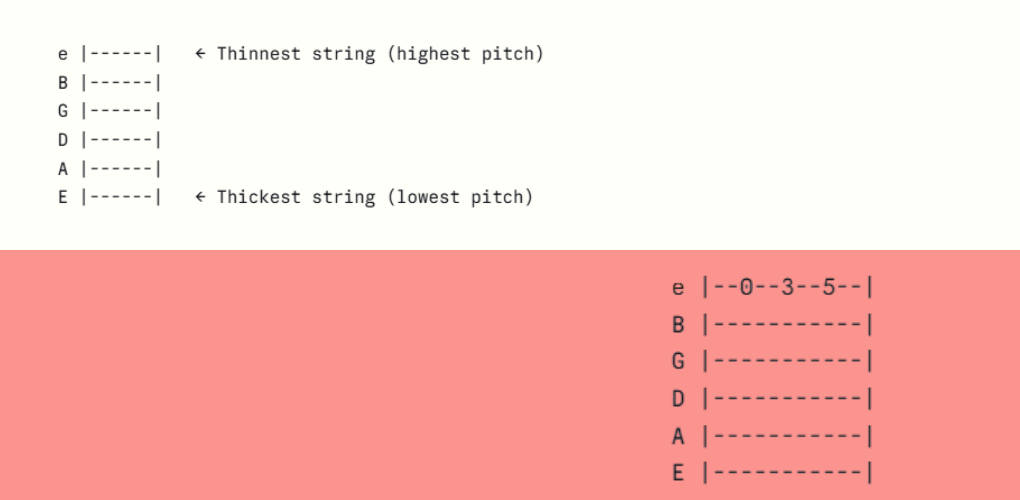
Read TAB from left to right. Numbers at the same horizontal position are played at the same time (a chord). Numbers at different horizontal positions are played one after another (a melody or riff).
Common TAB symbols you will encounter as you progress: h = hammer-on, p = pull-off, b = bend, / = slide up, \ = slide down, ~ = vibrato. For a complete explanation of what each of these technique symbols means and how they are executed, the guide on music symbols for musical notes is an excellent reference.
Also, before you start playing through these tabs, your picking hand technique matters more than most beginners expect. Solid pick grip from the very beginning prevents bad habits that slow your progress later the guide on how to hold a guitar pick correctly walks you through the correct technique step by step.
Difficulty Rating System
Each tab in this guide is rated on a three-tier scale:
Absolute Beginner: Single string only, low fret numbers, slow tempo. Zero prior experience required.
Early Beginner: Two or more strings, basic fret position shifts, slightly more right-hand coordination needed.
Developing Beginner: String crossing, basic rhythm complexity, or introductory techniques such as hammer-ons and slides.
Section 1: Easy Acoustic Guitar Tabs
Acoustic guitar is the ideal starting point for most beginners. The slightly higher string action demands cleaner fretting technique and more deliberate picking habits that pay off on every instrument you play later. These easy acoustic guitar tabs are selected because they are immediately playable, musically satisfying, and progressively build the technique you need.
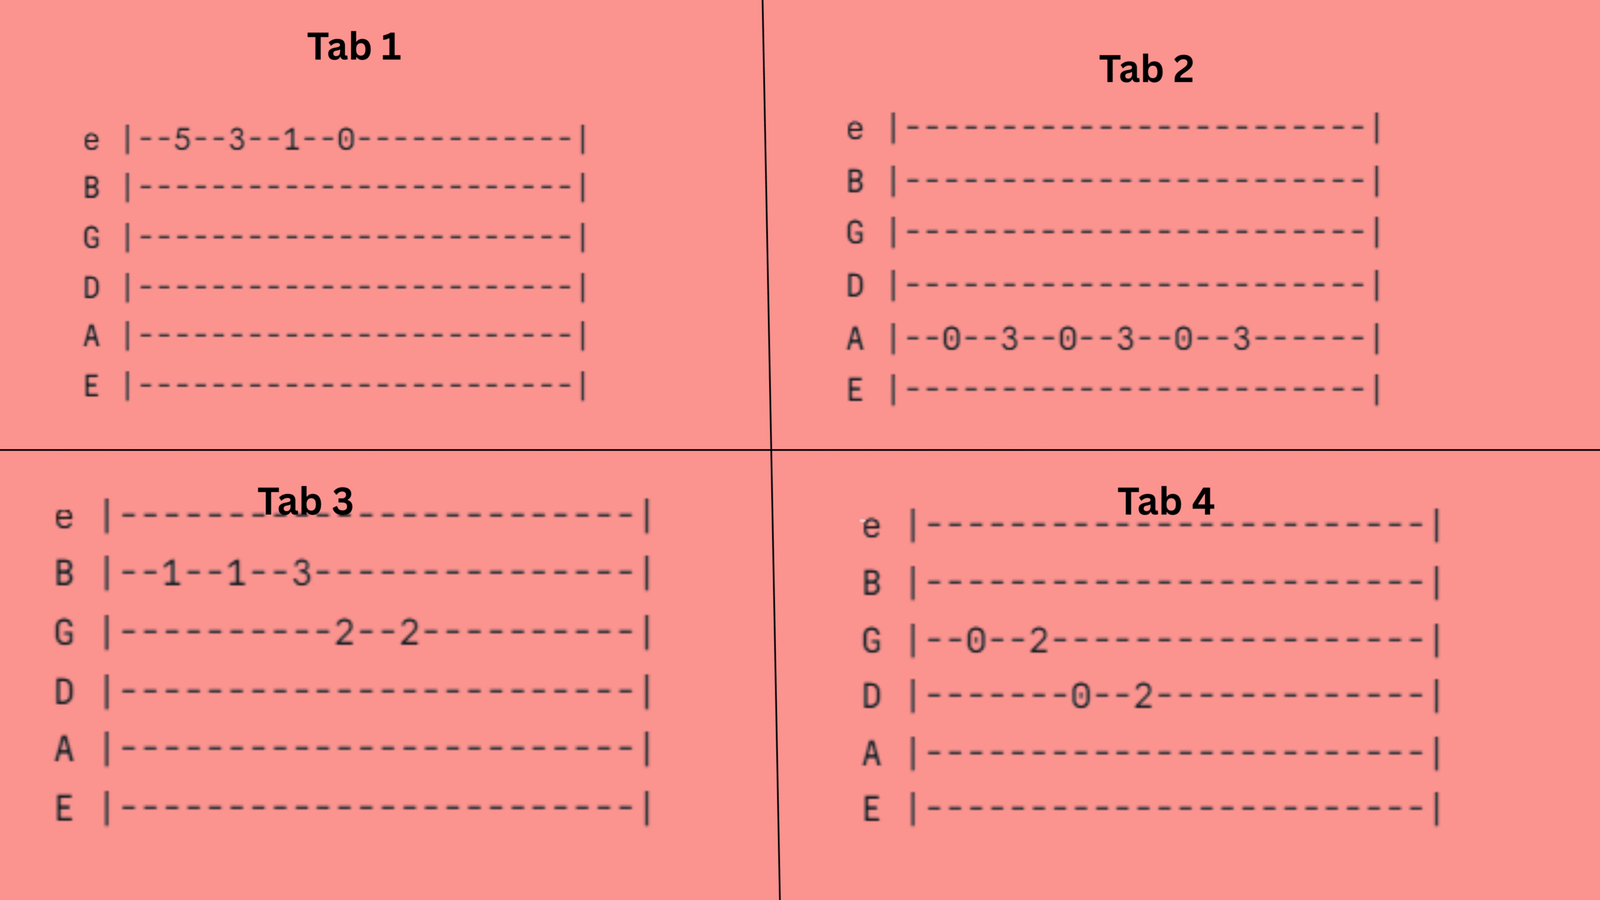
Tab 1 – Single-String Descending Melody in Open Position
Difficulty: Absolute Beginner | Technique Focus: Single string, open notes, basic fret movement
A simple descending melodic pattern using the high e string between frets 0 and 5. The open string and three fretted notes create a gentle, stepwise melody that sounds musical from the very first attempt.
Practice tip: Play each note slowly and let it ring fully before moving to the next. Focus on pressing the fret cleanly without buzzing.
Tab 2 – Two-Note Power Riff on Low Strings
Difficulty: Absolute Beginner | Technique Focus: Low string picking, fret accuracy, rhythmic repetition
A repeating two-note riff on the low E and A strings. The pattern alternates between an open string and a fretted note, which is one of the most fundamental picking patterns in all of guitar playing.
Practice tip: Keep your picking motion small and consistent. Large arm movements waste energy and slow your speed.
Tab 3 – Three-String Ascending Arpeggio
Difficulty: Early Beginner | Technique Focus: String crossing, arpeggio movement, finger independence
This pattern moves across three adjacent strings in an ascending arpeggio playing one note per string in sequence. It introduces the right hand to crossing strings without strumming.
Practice tip: Use your thumb for lower strings and your index and middle fingers for higher strings if fingerpicking, or use a pick with deliberate upstroke-downstroke alternation.
Tab 4 – Pentatonic Scale Fragment (First Position)
Difficulty: Early Beginner | Technique Focus: Scale pattern, two-string movement, position awareness
A four-note fragment from the minor pentatonic scale — the most used scale in popular music. Learning this fragment introduces the concept of a scale shape and prepares you for soloing later.
Practice tip: Practice ascending (low to high) and descending (high to low) equally. Most beginners only practice going up.
Tab 5 – Slow Fingerpicking Pattern Over Open Strings
Difficulty: Early Beginner | Technique Focus: Fingerpicking, right-hand independence, alternating bass
A gentle fingerpicking pattern that alternates a bass note on the low strings with melody notes on the higher strings. This pattern is the foundation of acoustic fingerstyle playing and feeds directly into Western classical guitar technique.
Practice tip: Assign your thumb to the low E string and your index, middle, ring fingers to the G, B, and e strings respectively. Keep this assignment consistent.
Tab 6 – Minor Melody Using Three Frets
Difficulty: Absolute Beginner | Technique Focus: Minor tonality, single string, fret 1 to 3 range
A short, stepwise minor melody confined to the first three frets of the B string. Minor melodies have a naturally expressive, slightly melancholic quality that sounds more advanced than it actually is.
Tab 7 – Waltz-Feel Melody in Three-Quarter Time
Difficulty: Early Beginner | Technique Focus: Rhythmic grouping, three-beat feel, two-string melody
A melody designed in three-quarter time three beats per measure. Playing in 3/4 introduces a waltz-like lilt that helps beginners develop rhythmic feel beyond the standard four-beat pattern. Understanding how rhythm works across different time signatures connects directly to the broader concept of the 7 elements of music.
Practice tip: Count “one-two-three, one-two-three” aloud while playing. The first beat of each group should feel slightly emphasized.
Tab 8 – Chord Melody Fragment (Single Note with Bass)
Difficulty: Developing Beginner | Technique Focus: Simultaneous bass and melody, two-string coordination
A short passage where a melody note on the high e string is played simultaneously with a bass note on the low E string. This introduces the concept of chord melody a foundational technique in both acoustic fingerstyle and film guitar playing.
Practice tip: Press both strings cleanly at the same time. The bass note should not overpower the melody.

Tab 9 – Simple Hammer-On Exercise
Difficulty: Developing Beginner | Technique Focus: Hammer-on (h), left-hand strength, legato sound
An introductory hammer-on pattern. Pick the first note, then use a left-hand finger to “hammer” onto the next fret without picking again. This creates a smooth, connected legato sound.
Practice tip: The hammering finger must strike the fret firmly and quickly a weak hammer-on produces a muted, buzzy sound rather than a clean note.
Tab 10 – Two-String Sliding Melody
Difficulty: Developing Beginner | Technique Focus: Slide technique (/), position shifts, smooth movement
A short melody that uses a slide between two fret positions on the G string. Sliding introduces fluid fret-to-fret movement that feels very different from lifting and repositioning a finger.
Practice tip: Maintain light but consistent pressure on the string throughout the slide. Lifting your finger mid-slide kills the sound.
Section 2: Easy Electric Guitar Tabs
Electric guitar opens up a distinct tonal world sustained notes, driven tones, and riffs that ring with power. These easy electric guitar tabs take advantage of what electric guitar does best while keeping the technique firmly within beginner reach.
Tab 11 – Low-String Power Riff (Two Strings)
Difficulty: Absolute Beginner | Technique Focus: Low string power, rhythmic accenting, string muting
A driving two-string riff on the low E and A strings using power-chord-adjacent single notes. This riff teaches the fundamental electric guitar skill of controlled low-string picking with clean muting between accents.
Practice tip: Rest your palm lightly on the bridge to mute strings you are not playing. Clean muting separates beginner sound from professional sound more than almost any other technique.
Tab 12 – Blues-Based Riff Using Minor Third Interval
Difficulty: Early Beginner | Technique Focus: Blues tonality, minor third interval, two-string movement
A two-string riff built around the interval of a minor third is the defining sound of blues and rock guitar. This riff introduces the emotional quality of the blues scale without requiring full scale knowledge.
Practice tip: Give each note a slight accent on the beat. Blues riffs have swagger play them with confidence rather than caution.

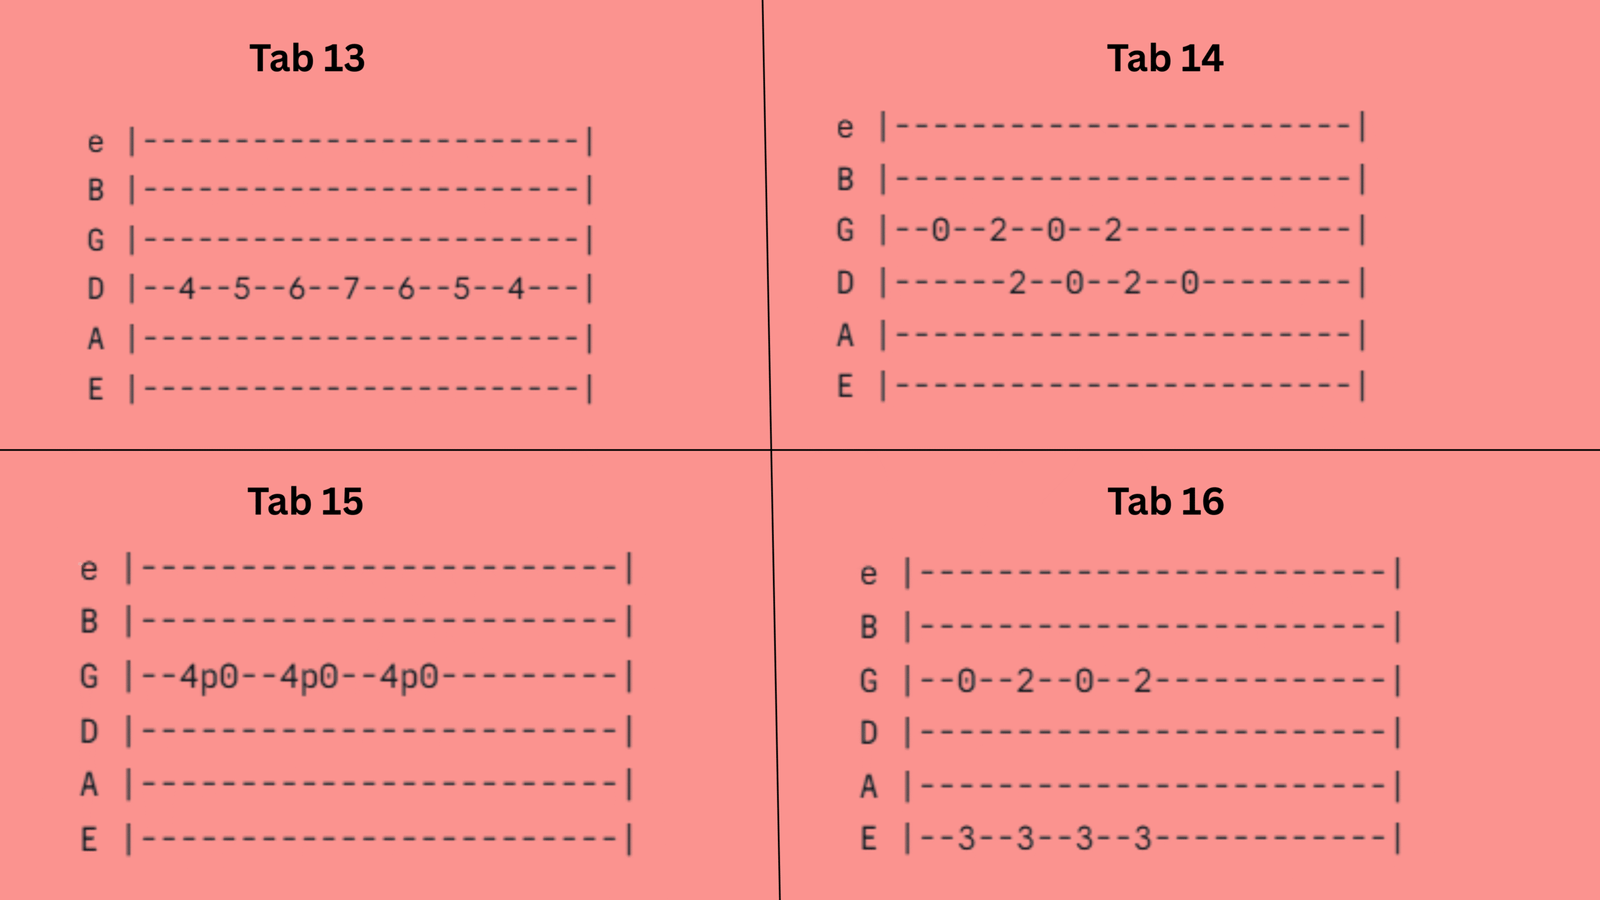
Tab 13 – Chromatic Exercise Disguised as a Riff
Difficulty: Early Beginner | Technique Focus: Chromatic movement, one-finger-per-fret discipline, evenness
A chromatic pattern using four consecutive frets one per finger. This is both a practical technique exercise and a real-sounding riff when played with rhythmic purpose.
Practice tip: Assign one finger per fret and keep all four fingers close to the fretboard at all times. Fingers that fly away from the neck slow your speed dramatically.
Tab 14 – Pentatonic Box Pattern Introduction
Difficulty: Early Beginner | Technique Focus: Pentatonic scale box shape, position playing, two-notes-per-string
The first pentatonic box positions the single most important scale pattern in electric guitar. Two notes per string across two adjacent strings. This is the foundation of virtually every rock and blues solo ever played.
Practice tip: Play slowly and evenly. Speed is irrelevant at this stage, clean execution at slow tempo is the entire goal.
Tab 15 – Rock Riff with Open String Pull-Off
Difficulty: Developing Beginner | Technique Focus: Pull-off (p), open string, legato phrasing
A riff that uses a pull-off from a fretted note to an open string. The pull-off creates a fast, fluid note transition that would be impossible to execute cleanly with separate pick strokes at higher tempos.
Practice tip: Pull your fretting finger slightly downward (toward the floor) as you release it this plucks the string rather than just lifting away from it.
Tab 16 – String-Skipping Riff (Non-Adjacent Strings)
Difficulty: Developing Beginner | Technique Focus: String skipping, right-hand accuracy, note spacing
A riff that alternates between the low E and G strings skipping the A and D strings between them. String skipping develops right-hand precision and an awareness of the fretboard as three-dimensional space.
Practice tip: Practice the right-hand string skipping motion alone (without fretting) before adding left-hand notes. Right-hand accuracy on string skips is harder than it looks.
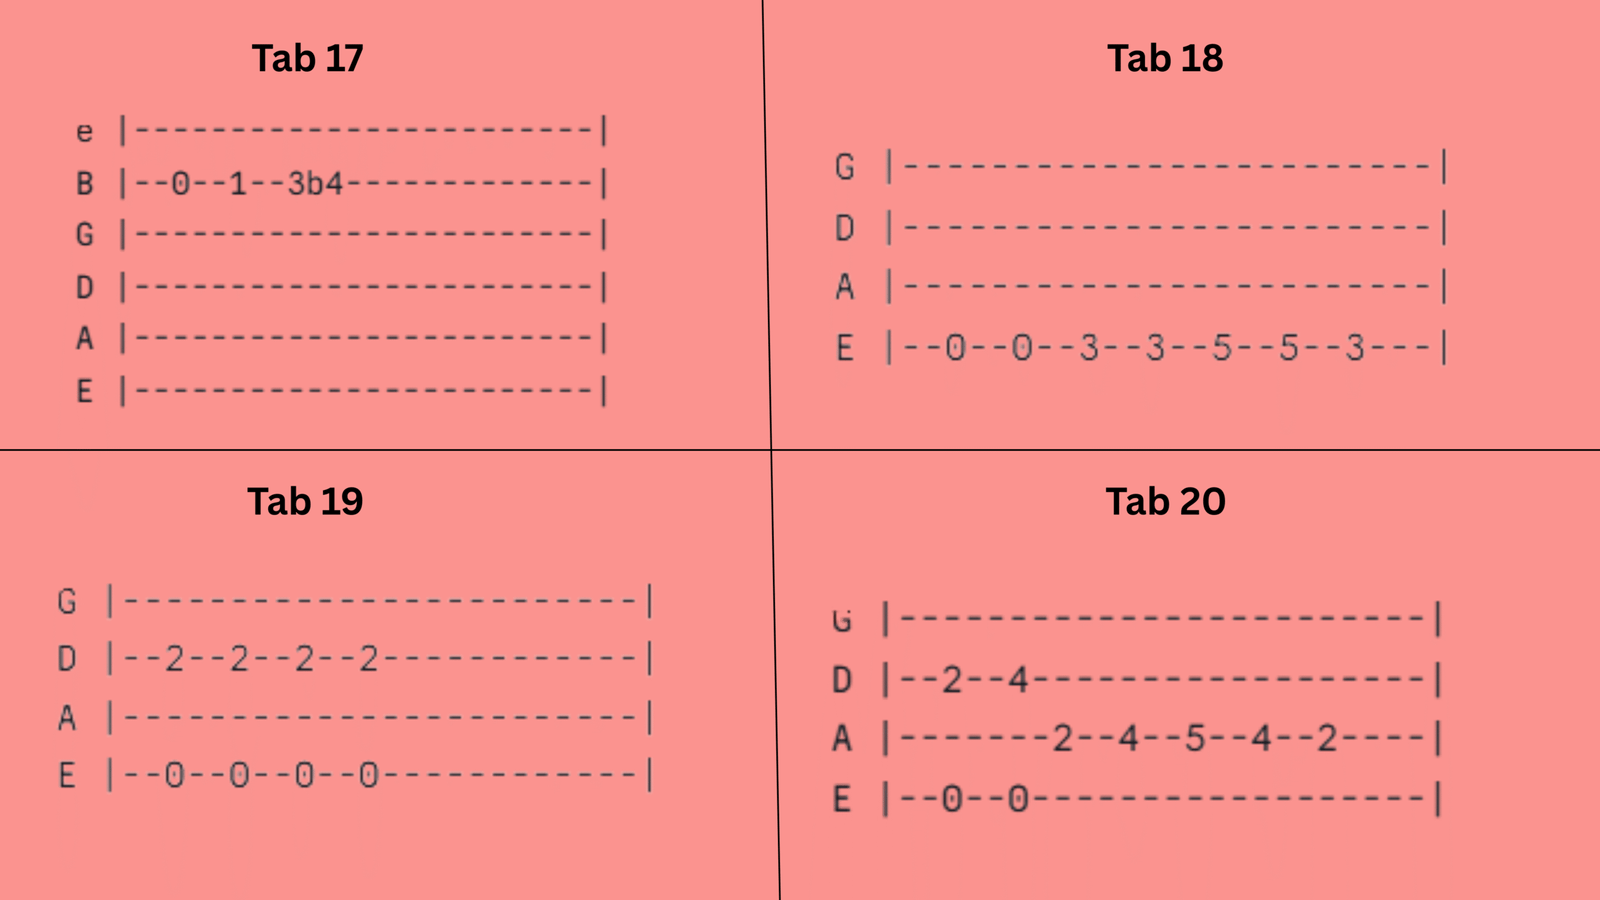
Tab 17 – Melodic Bend Introduction (Half Step)
Difficulty: Developing Beginner | Technique Focus: Bend (b), intonation control, string pressure
A short phrase ending with a half-step bend the most fundamental expressive technique in electric guitar. Bending a string raises its pitch, adding vocal-like expressiveness to even simple phrases.
Practice tip: Support the bending finger with the finger behind it on the same string. Bending with one finger alone strains your hand and produces imprecise pitch.
Section 3: Easy Bass Guitar Tabs
Bass guitar tablature uses four strings (E-A-D-G from lowest to highest) and focuses on rhythmic groove, note clarity, and foundational harmonic support. These easy bass guitar tabs develop the core skills every bassist needs. Students exploring bass guitar lessons at BMusician will recognize these patterns as foundational exercises taught from the earliest sessions.
Tab 18 – Root-Note Walking Bass Line
Difficulty: Absolute Beginner | Technique Focus: Single-string groove, rhythmic consistency, even note spacing
A simple walking bass line using only the E string. Root-note bass lines are the foundation of all bass playing, establishing the harmonic center of the music while locking in with the rhythm.
Practice tip: Every note should have identical volume and duration. Consistency is the bassist’s most important quality in any ensemble setting.
Tab 19 – Two-String Groove Pattern with Octave Jump
Difficulty: Early Beginner | Technique Focus: Octave movement, two-string coordination, groove feel
A bass groove that jumps between a root note on the E string and its octave on the D string. Octave jumps are one of the most commonly used techniques in funk and pop bass playing — they add energy and bounce to a groove without harmonic complexity.
Practice tip: The two notes of the octave should feel like a rhythmic unit of a bounce. Practice muting the A string cleanly between the E and D string notes.
Tab 20 – Syncopated Bass Riff Across Three Strings
Difficulty: Developing Beginner | Technique Focus: Syncopation, three-string movement, rhythmic displacement
A bass line where some notes fall between the main beats is a technique called syncopation. Syncopated bass lines create the feeling of rhythmic tension and release that makes groove-based music feel alive rather than mechanical. Use BMusician’s metronome at 80 BPM to lock in the timing before increasing the tempo.
Practice tip: Count every subdivision “one-and-two-and-three-and-four-and”, while playing. Syncopation only grooves when the player knows exactly where the beat is, even when the notes are landing between beats.
How to Build a Practice Routine Around These Tabs
Attempting all 20 tabs at once leads nowhere. Focused, progressive repetition on a small number of tabs builds real skill far faster than scattered contact with many.
Weeks 1–2: Choose two Level 1 tabs. Play each one ten times daily at a slow, deliberate tempo using the metronome starting at 50–60 BPM. Focus entirely on clean fretting, consistent picking, and letting each note ring fully. Do not increase tempo until every note is clean.
Weeks 3–4: Add one Level 2 tab. Use the Level 1 tabs as a warm-up at the start of each session. Practice each hand separately on the new tab before combining them.
Week 5 onward: Introduce Level 3 tabs one at a time. By this point, your finger strength, fret accuracy, and string-crossing ability will have developed enough to handle the additional complexity without frustration.
The progression logic throughout this list is consistent: single string → multiple strings → string crossing → expressive techniques like hammer-ons, pull-offs, bends, and slides. Every tab builds on the technique developed in the tabs before it.
Beyond Self-Teaching: When Structured Lessons Make the Difference
Guitar tablature is one of the most powerful self-teaching tools available to beginner guitarists. But TAB has a ceiling. It does not convey rhythm with full precision, it does not explain the theory behind why certain notes sound good together, and it does not correct your technique before poor habits become deeply embedded.
Working with an expert instructor fills every one of those gaps. A skilled teacher watches your picking hand, adjusts your fretting posture, and builds your musical understanding beyond individual riffs and patterns. BMusician’s guitar lessons offer one-to-one live instruction from experienced faculty across classical, film, and Carnatic styles designed to take you from your very first tab to genuinely musical, confident playing. Students interested in the melodic richness of Indian classical music will find that Carnatic guitar lessons introduce an entirely different set of beginner-friendly melodic patterns rooted in the Indian raga system, a rewarding complement to Western tab-based learning.
Start with tab one. Tune your guitar first. Everything else follows from there.